Transfer the track plan to the baseboard

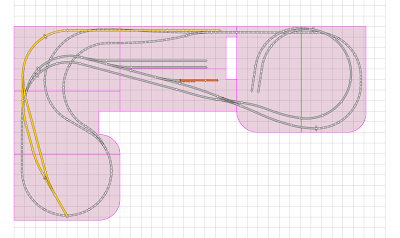
I decided to transfer the track plan to the baseboard without actually printing it in full size. AnyRail is perfectly capable of doing that, but even if I leave out any empty pages it is still quite a stack of paper which will only be used once.

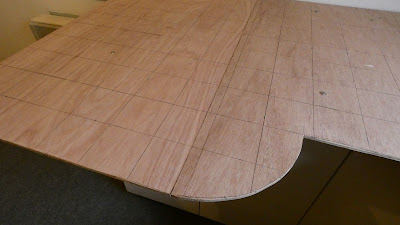
So I go the old fashioned way and replicate the the grid on the baseboard.


Then it is al about marking intersections of the track with the grid. I also made a simple tool to draw the centerline and side of the 422mm radius curved sections.


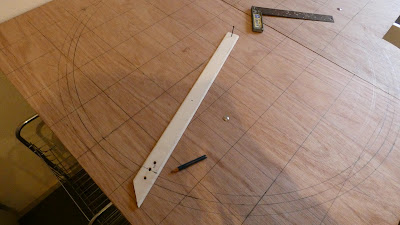
After drawing a few sections I will obviously have to check with real track before i start cutting the cork roadbed.

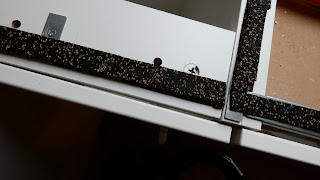
I also added aluminium u-profiles to the sides of the baseboard to make sure adjacent plywood sections are perfectly aligned. This is necessary because the overhang is up to 40cm and this will cause the plywood to bend slightly if weight is put on it.


These profiles are thin so they won't block the cabinet doors when they open. You can get these profiles from stores that sell parts to create flightcases.

Trackplan tweaks

 Now the baseboard is finalized, the track plan can be tweaked.


The yellow track is a passenger track that will operate on a shuttle schedule, leaving from the small station (nothing more than a rural stop really) an then going to the top right into a tunnel before it returns.

The orange track will be a programming track and the grey track the main goods track.

Everything is laid out on three levels. The uppermost level is the passenger track, the mid level is the switching yard for the goods track and the lower level is a small shadow track with a short parallel section so I can have trains running contineously in both directions.

On the right a part of the goods track branches off and goes up to a twin track that will be inside a removable diorama of a mine.

Some tweaks were necessary to make sure that the section with the double slip switch has enough clearance below the roof support that juts out upward through the baseboard (the white gap in the middle)

Next steps are to transfer the track plan to the baseboard and constructing the supports for the switching yard. The aim is to fully contruct the goods track before adding the passenger track. I am already looking at digital solutions, but for track testing purposes I can temporarily run an analog train.


Baseboard

Added the plywood baseboard. Used rubberized cork the acoustically decouple the board from the kitchen cabinets it rests on.


The baseboards are modular and fixed using m5 bolts and I made sure to add a piece of cork below the washers too, to prevent a contact bridge. Not sure how well it is going to work but it won't hurt either.

I also rounded the corners to prevent injuries and the layout also has an extra gap in the inside corner which allows me to reach the far end.


The final bit I need to take care of is to link some of the board edges, because even though I used fairly high quality 9mm hardwood plywood, there is some bending and the left part near the roof support has an unsupported 50cm wide overhang which may sag (this overhang is unsupported because I put the cabinet below it on wheels so it can be removed if I ever need to access the space behind).

Progress with room preparation: walls, carpet and sub-baseboard

A snapshot of the finished (but still empty) room:

There is a bit discoloration visible on the heater below the window: Apparently the radiator paint is not heat resistant enough to deal with a gas heater 😞

As soon as the room was ready, I put in the IKEA Metod kitchen cabinets that act as my sub-baseboard and convenient storage area.

Note that I have fitted the small cabinet to the left of the large roof joist with wheels so that later it can be moved easily if needed, for example, to get access  to the space beyond the cabinets if a train falls of or something.

The baseboard itself will be the next step.

Progress with the room preparation

 In the last couple of weeks I've been busy preparing the train room. I've made some nice progress and went from a bare, fairly dark room to a nicely painted, much lighter room. 


It isn't perfect, but for a hobby room it is more than adequate. There are still some details to fix here and there, like some lighting fixtures etc, but in principle I can start adding the kitchen cabinet bases that I will use as a sub baseboard.