While I started working on the rather boring preparation stuff for the room, like stripping old wallpaper, I looked around for decent and affordable track planning software.
I would have liked Open Source stuff running on Linux, but in the end, I decided to buy AnyRail, since I did not like xtrkcad much: at least for me xtrkcad's user interface did not feel natural and it has no options to export to other (3d) formats.
AnyRail on the other hand has a quite natural user interface and even though it is not free, it doesn't break the bank either (and you can download a fully functional trial version first, that is only limited in the number of track segments it allows you to add).
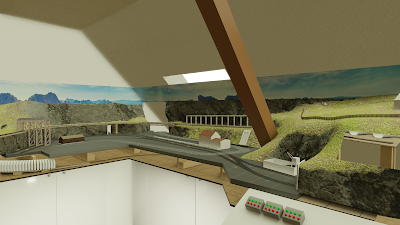
It runs fine on Windows 10 with a modern, ribbon-based interface, and I run it inside a VirtualBox environment without any trouble. The only downside of this setup is that I cannot use the native 3D visualization since it requires a recent version of DirectX, something that VirtualBox does not support (*edit: it does work!, see at the end). It is however quite easy to export your layout as a 3d file (Collada, Stanford PLY, STL, OBJ, ...) and then render it in Blender and that is sufficient for me.
AnyRail has all the functionality you would ask for in a track layout program, including height, vertical clearance warnings, highlights of too sharp curves, etc. Out of the box it comes with a ton of track and object libraries and there are lots of user-defined objects too (for Faller, Kibri, ...) that can be downloaded with a simple mouse click.
I am going to work with Piko A track and setting up a sketch of the baseboard and a track plan took only a couple of hours. Below is my first attempt. Looks a bit crowded perhaps, but that's because I show also the hidden track (which runs on the lower level), to check if everything fits within the baseboard outline.
As you can see, the baseboard has to fit in a room with some peculiar constraints: for example, the backside is a slanted roof and therefore we cannot use the last 60 centimeters or so (the grid is 10x10cm). Also, the white gap at the top represents a roof beam.
Luckily AnyRail even offers some CAD functionality as well, including rounded corners, rulers, etc. And of course layers: here I only show the layers for the main track, baseboard, and rulers, but on other layers, I have defined the outlines of the cabinets the baseboard will be rested on, the room itself (including that roof beam) and I will add layers for wiring later, along with a layer for a second track that will be narrow-gauge (AnyRail can deal with mixed track).
All in all a pretty nice program, with swift support too by its creator. If anything negative can be said, it would be that flex track manipulation is rather limited (I am especially missing conversion from fixed-length track segments to a flex track curve which would make it easier to create a good fit layout while finally switching to flex to reduce joints.)
VirtualBox
The following settings work (with an Nvidia 1080 at least, running a W10 guest):
VirtualBox 6.1.26_ubuntu + Guest Additions CD (very important, otherwise you won't have suitable drivers)
256Mb video ram
Vboxsvga
3d accelleration *dis*abled!