Welcome to my second train project.
The idea is to document on this blog various aspects of my new model railway layout.
The first one was really small, just a large table with a simple oval and a siding, and largely scenery oriented, that is, I learned a lot about scratch building/ kit-bashing, 3d printing and all sorts of things really.
But I want a little bit more, so I decided to scrap the old layout (of course recycling all that is feasible) and start building a new, larger layout.
In fact I am lucky that I can use (most of) the spare bedroom, which is still not very large, but will be large enough to create a more realistic track plan.
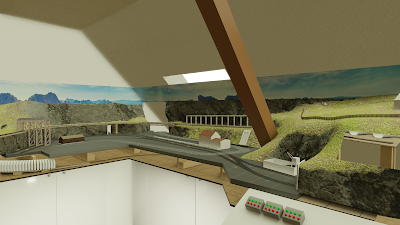
I use Blender to create some visualizations and the current plan is shown in the image (with a lot of scenery missing; it is mostly about track layout and heights). As you can see, the spare bedroom features a slanted roof with a very prominent roof beam but I plan to literally mould the terrain around it.
Almost everything is most likely to change as the planning progresses, but for the lower support part: I am actually going to use Ikea "Metod" kitchen cabinets for the base. This is fairly expensive, but has two major advantages: it provides lots of storage space while looking tidy and, even more important, makes for easy height adjustment, an essential feature in an old wooden frame house with a not completely even floor.
The top of those kitchen cabinets is just two wood composite strips so I can put any kind of baseboard on top (plywood, OSB, ...) and still reach any wiring if I don't put too much junk on the upper shelf of any cabinet, so it is practical too. I think I will mount the baseboard with wingnuts so that it (or sections of it) can be removed later.
Currently I have more or less cleared the room, so the next step is to redo the walls (remove old wall paper and give it a lick of paint) and lay some carpet.